How to Fund my eWallet and How to Transfer Funds to Another Account?

How to Fund my eWallet and How to Transfer Funds to Another Account?
How to Fund my eWallet and How to Transfer Funds to Another Account?

[wpseo_breadcrumb]

For some time now, few of our customers and visitors kept asking how our billing works. They’re asking if we are capable of adding funds. And even transferring funds from one account to another, in case they have multiple accounts with us.

We heed to their request and so we are now adding new features.

Here are the steps in Adding and Transferring funds:

Adding of Funds

  1. Log in to your account.
  2. After that, click My Wallet.
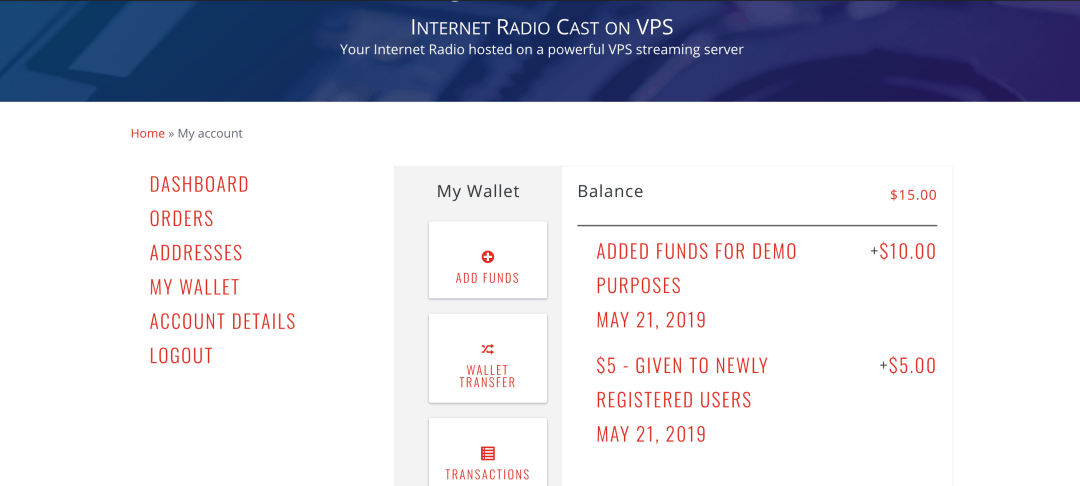
    • In image_exhibit 1 shown below, you can see a list of all transactions where your “My Wallet” has been used. Either in purchasing products, funding or transferring funds to another account.
  3. To continue with adding funds, navigate to the “Add Funds” menu.
  4. Enter the amount of money to fund your account. (Minimum funding is $10 and Maximum funding is $200)
  5. Then, click Add after.
    • You will now be redirected to the Checkout page. From there, just fill the required fields and then place your order.
  6. Once payment has been made, the funds will now be reflected in your account. As shown in the wallet icon, in the top right header menu.


Transferring of funds to another account

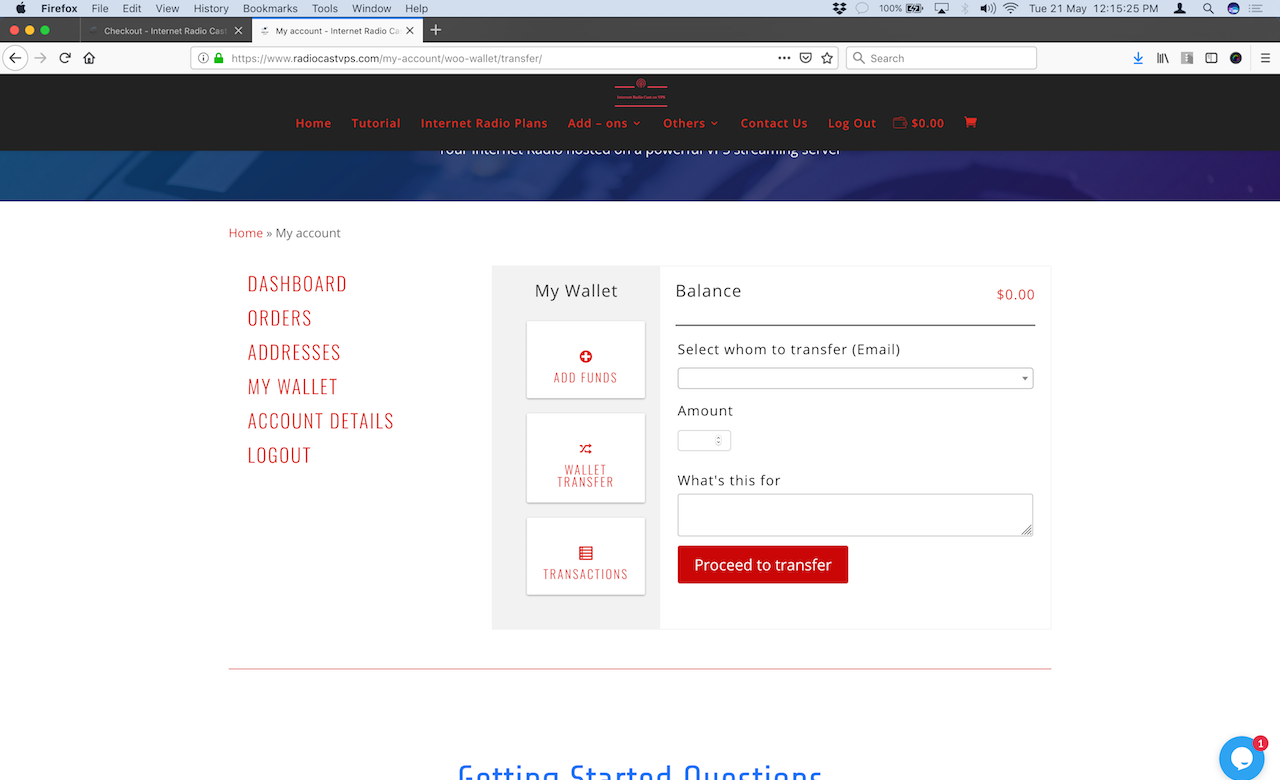
  1. Click the Wallet transfer icon
  2. There are 3 fields to be completed
    • The email address of the recipient – Make sure that the email address has been registered already otherwise, no results will be found in the search field.
    • The Amount – The amount that will be debited from your account. Minimum fund transfer is $10.
    • The optional message – It’s an optional message explaining the purpose of the fund transfer.
  3. Once you completed the required fields, just click the transfer button and you are done.

Both parties will received email notification of the transaction. And will be recorded for keep sake purposes.

But the good news about this feature…

For every newly registered user who bought their first product, a cash back program of $5 will be credited to their wallet! This can then be use for their next purchase or subscription!

Happy streaming everyone!!!

Thank you to Terra Wallet for providing this useful plugin!

Updated: June 25, 2019 – Cash back program is no longer active.

How to setup CORS Proxy Server to stream secured Shoutcast streaming link

How to setup CORS Proxy Server to stream secured Shoutcast streaming link

[wpseo_breadcrumb]

What is CORS PROXY and why is it relevant for your live streaming radio?

According from this website,

A CORS proxy is a service that allows developers (probably you) to access resources from other websites, without having to own that website.

How is it relevant to your streaming server?

Well, if you have a web player and want to stream securely, meaning your website server has SSL certificate. Then, you are streaming with https url instead of the regular http. Unfortunately, Shoutcast won’t stream properly if using with HTTPS. This means, there’s a possibility that only the audio, streams correctly while the album artwork or even the title name doesn’t display at all.

So here’s where the CORS PROXY server takes an important role. Developers of your web players will create this proxy server and will bind it with your ShoutCast streaming url in order to stream securely…

So if you want a secured streaming URL with the correct informations showing up, I would suggest that you have to set up one. Like this website, audiogasmradio.com. He just bought a web player from our company.

Some developers are offering in setting up for you for a fee ranging from $35-$60. But if you want to try it yourself, below is a great tutorial from YouTube on how to do it. I also offer to set it up for you, if you are not confident enough in playing around the SSH terminal.

Shoutcast directory listing is not free anymore but we provide it for you!

Shoutcast directory listing is not free anymore but we provide it for you!

[wpseo_breadcrumb]

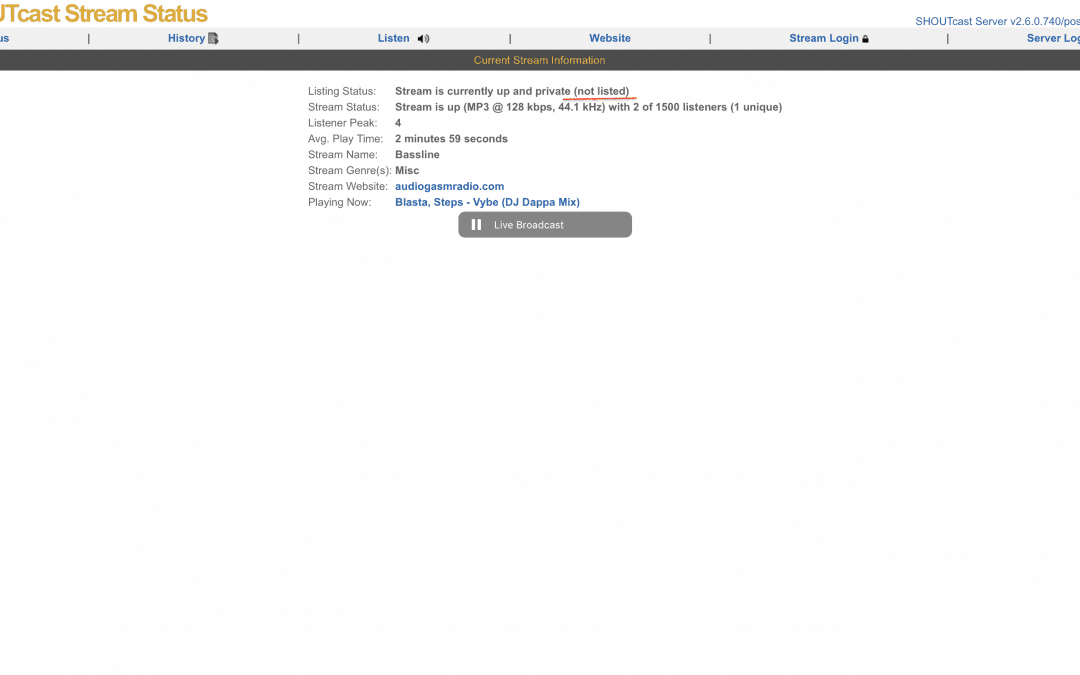
Recently, Shoutcast directory listing is not free anymore. From the past, creating an authhash was quite simple. But if you try it now, you will be redirected to SHOUTcast website instead of Radionomy (RMO). They will be offering you paid services to list your radio station in the shoutcast directory. 


Radionomy bought Shoutcast


This recent development is due to the fact that Radionomy, a Belgian company bought Shoutcast and Winamp sometime in 2014. But their decision to make the directory listing private for paid users only is probably just this year. As long as you have a plan from them, your Azuracast radio station can advertise to YP Directories (Public Station), better known as the Shoutcast directory listing.


Internet Radio Cast on VPS provides the Shoutcast directory listing for you


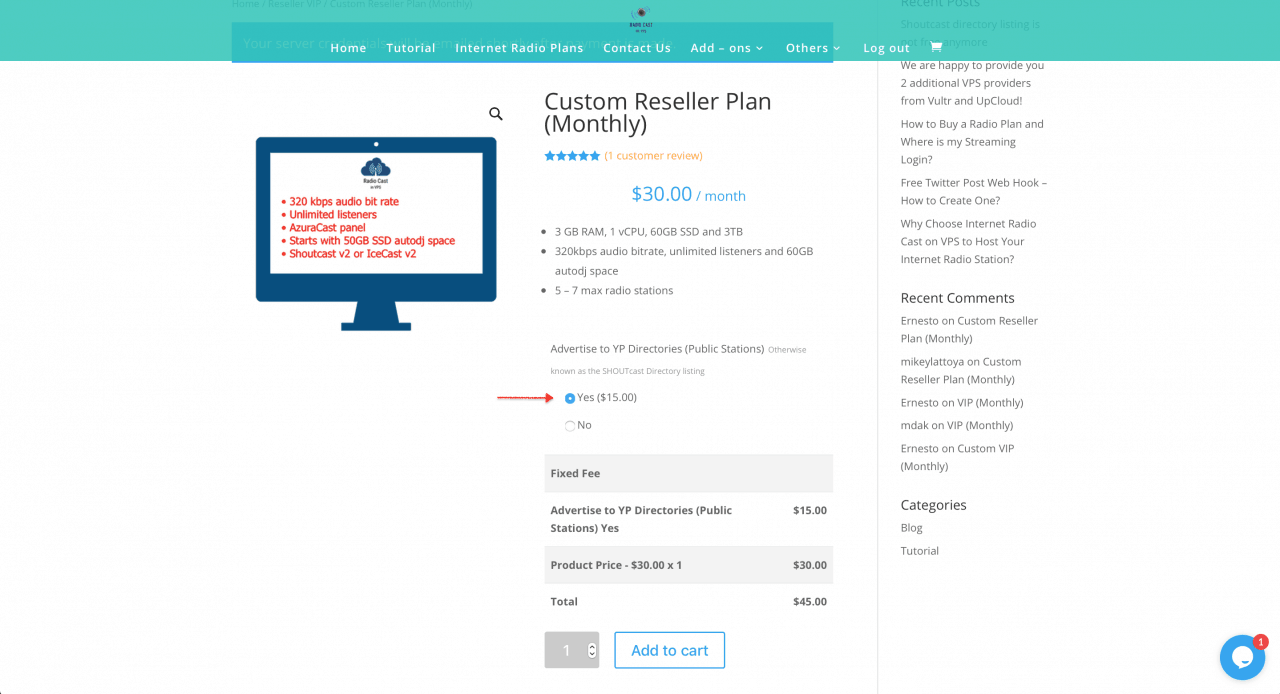
Alternatively, Internet Radio Cast on VPS can advertise multiple radio stations but for our VIP Reseller packages only. When buying a Custom reseller plan, optionally choose yes on the radio button option. And you can now avail the listing for just $15 month. You will have 5-7 stations with a valid authhash for your SHOUTcast directory listing for each station. You can actually save around $50+ per month for listing individual stations!


We are happy to provide you 2 additional VPS providers from Vultr and UpCloud!

We are happy to provide you 2 additional VPS providers from Vultr and UpCloud!

[wpseo_breadcrumb]

Our Company is growing and increasing clients from around the world. And because of that, we expand our capabilities of providing remote servers to different continents. Specifically, Vultr will be providing Australian cloud servers for our Australian and New Zealand clients. And while we plan to use UpCloud to focus on the European market.

UpCloud

According to them, it’s the world’s fastest cloud servers. We can’t deny it to the fact that indeed their servers are fast and reliable. Installed with Azuracast, your radio station will definitely be more faster and reliable than any traditional streaming servers. Of course, the prices will stay the same. Starting at $15/month, you will have up to 320kbps audio bitrate, unlimited listeners and 25GB autodj space. Try it now and don’t miss the opportunity!

Vultr

Currently, it’s our only cloud server that offers Australian data server location. And because of it, we are able to provide internet radio stations for our Australian clients and nearby countries. At the same price, you will benefit exactly the same high quality bitrate and unlimited listeners. Once again, grab the opportunity!

Conclusion

With these additional cloud service providers, we are now confident enough to provide our clients the most reliable servers. And the availability of these servers are just a click of the button. Additionally, our WordPress hosting services also benefits with these new providers. As we can expand the locations of our web hosting too. In no time, we will create and configure your internet radio streaming servers and/or web hosting servers immediately after your order has been completed!

How to Buy a Radio Plan and Where is my Streaming Login?

How to Buy a Radio Plan and Where is my Streaming Login?

How to Buy a Radio Plan and Where is my Streaming Login?

[wpseo_breadcrumb]

How to create my own radio station in Internet Radio Cast on VPS?

Updated: June 3, 2019
To create your own radio station in Internet Radio Cast on VPS, you have to buy or subscribe a free trial plan. You don’t have to create an account prior to buying a plan. It is very easy and direct, just follow these simple steps.

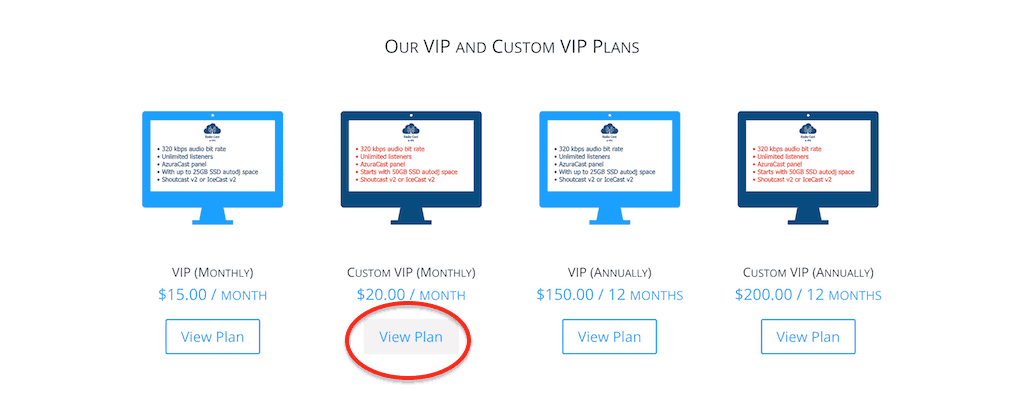
Step one: Choose the plan you need in the Homepage or in Products page

All the plans are clearly seen in the homepage and Radio plans menu. Choose view plans to view specific product and you will be directed to their single product page.

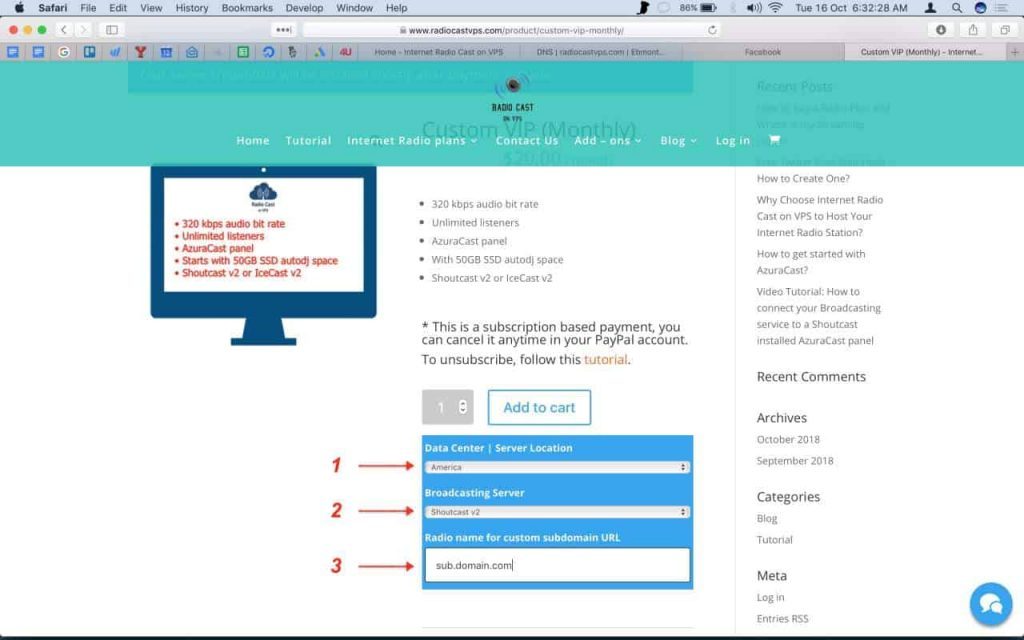
Step two: Choose the Server location, Broadcasting server and optionally, add further instructions

1 – First, under Data Center | Server location dropdown menu, you have 3 options to choose from… *Asia, America and Europe.

*In the future, we are planning to provide server location in countries such as Australia and New Zealand.

2 – Secondly, choose what type of broadcasting service do you want us to install in your server. Either Shoutcast v2 or Icecast v2.

3 – ***Additionally, if you have a domain name already hosted somewhere else. You can further instruct us to create a server that is under your domain name as a sub domain. For example, you have domainname.com, we can create a server that is sub.domainname.com. Whatever sub domain you want it to be. And because of this, your free web player will automatically become a **white labelled player.

** For this feature, white labelled web player and server, we require a one time payment of $20. This feature request may be created and paid after the server is functional. On the recent update, the extra field will be your radio station name. Once you provide a radio station name, your server will automatically create a station out from your added name.

*** This is not a required step. If you don’t want this feature, you can just leave it blank and proceed to add to cart button.

CHOOSE THE SERVER LOCATION

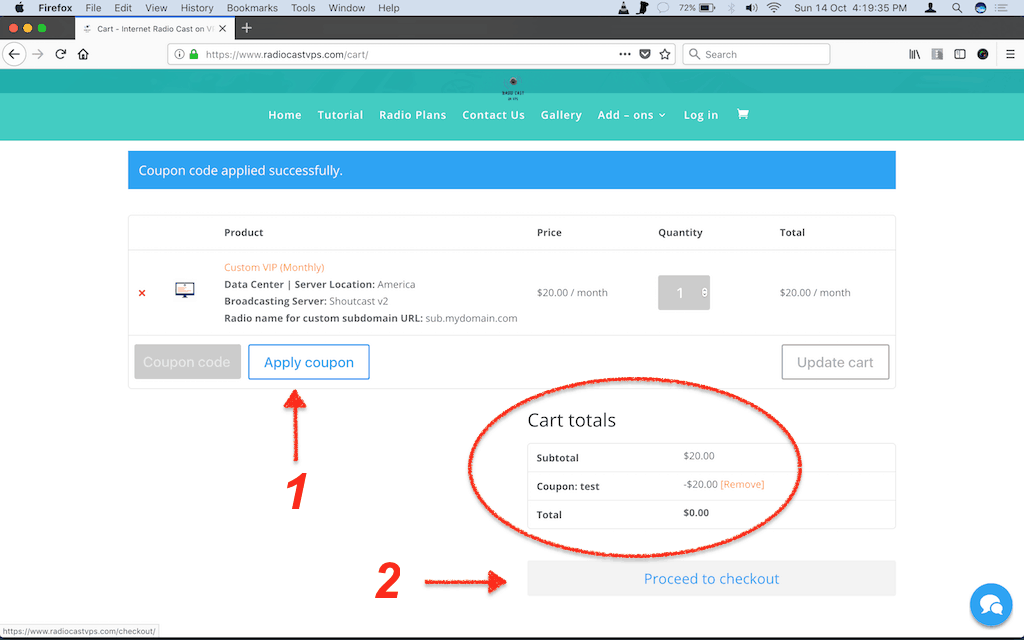
Step three: Add Product to Cart and apply a coupon code if you have one. Then proceed to checkout.

Once you have added the plan, you can enter this promo code, OPENING20. It’s a 60% discount for 1 month. That means you only pay $6 for a VIP plan! What’s inside the plan? Well, it’s a 320kbps and unlimited listeners. You get more than what you paid for!

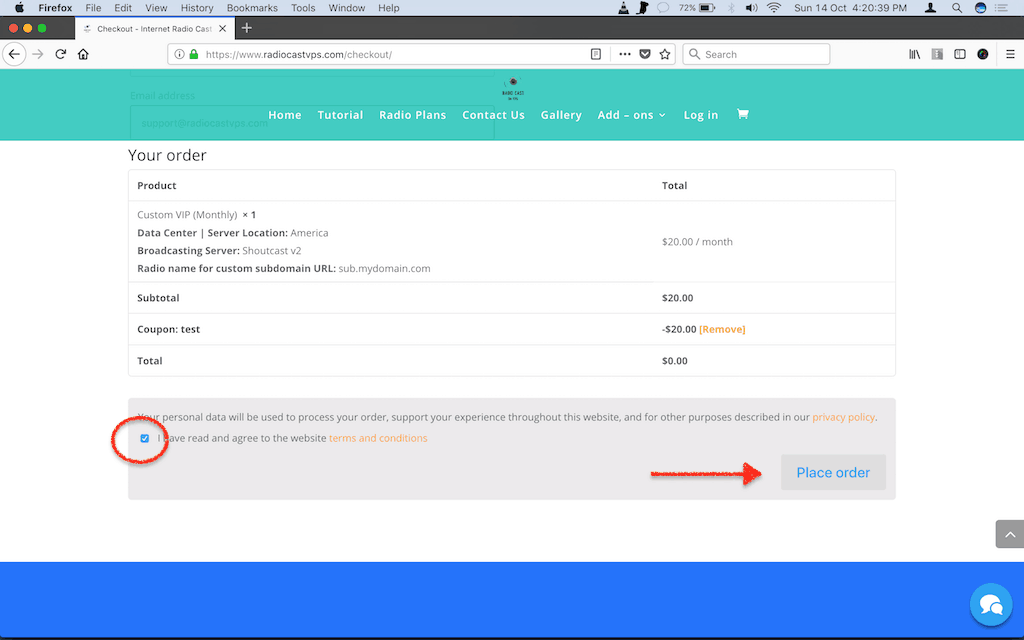
Step four: Fill up the required details and then check the box if you agree on our Terms and Condition. After that, Place the order.

After placing the order, you will now be redirected to Paypal’s website. Where you can either pay via your PayPal account or pay using your credit card via PayPal gateway.

Please be informed that you are not required to create a PayPal account in order to buy using a credit card.

Also please take note, that our website is not storing any payment information. All payments are redirected to PayPal for extra safety measures.

As of the moment, we don’t accept any other payment gateway other than PayPal.


Step five: Lastly, after payment is done, these are the things that you can do.

  • Finally, once you have paid via PayPal. You will be directed to a thank-you page, where you can see a summary of your order.
  • Your account has been created and you are log in automatically. Also, there is a direct link of your complete order overview.
  • You can also check your email, for your newly created account password. The username is the email you have registered.
  • Another email indicating that your order has been processed already. We will now be implementing a nav menu on your dashboard for your server credentials.

*The direct link of your account will always be, https://www.radiocastvps.com/my-account. But you can login and logout anytime using the primary menu above. Currently, log in menu is on the secondary navigation

In less than 1-3 hours, after your streaming server has been created.

  1. Another new email will be emailed to you. This time, with all the informations about your streaming server.
    • The log in link
    • Username and password for the login link
    • Host IP address for the live software connection
    • Port number for the live source connection
    • The source password for the live source connection
    • Admin password – for your Shoutcast or Icecast admin page.
  2. You can also find the same information in your account’s order menu.
    • A view button, indicating your streaming information and login link and the associated order. So if you bought 2 plans, they are separated and organized properly with different login links.
    • Additionally, a PDF invoice of your recent order.

You can visit the link anytime and login to your newly created streaming server. (Please check the slider image).

That’s all!

The thank you confirmation page

The user's automatic password creation sent via email

The order summary sent via email

The streaming server log in and connection information sent via email

In the order menu of the Account dashboard. With an Invoice button and a view button for each specific plan.

Inside a specific plan/subscription. All infos needed are there.

Finally, when clicking the login page, customers are directed to the streaming server